My last post in this series finished with this ‘skeleton’:
Do {
    Write-Host @"
[?] Display help
[Q] Quit
"@ -ForeGroundColor Cyan
    $menuChoice = Read-Host
    switch ($menuChoice) {
        '?' {
            Write-Host "Created by Barclay McClay"
            break
        }
        'q' {
            break
        }
        default {
            Write-Host "- Invalid Input -" -ForegroundColor Red
        }
    }
}Until ($menuChoice -eq 'q')
# If we've made it out of the Do{}Until() loops somehow- then exit gracefully.
Write-Host "Exiting..."
exit
I explained every line of code in depth, as-well as how the syntax worked.
In this post, I’m going to show you how to add more functionality to this tool.
Let’s add an option to our menu- ‘info’. If the User inputs ‘info’ in the main menu, they will get a readout of information about the device the script is running on.
Before we get started with the full tutorial, You might be after a copy of the final product. You can find that here: https://github.com/Barclay-McClay/Simple-PowerShell-CLI
The Menu
You are presented with a text menu (written in ‘Cyan’ colour). This text is a multi-line string that’s passed to our Write-Host command up the top of the script:
Write-Host @"
[?] Display help
[Q] Quit
"@```
Let’s add ‘info’ to this menu:
Write-Host @"
[info] Display Computer Info
[?] Display help
[Q] Quit
"@```
Please note I’ve formatted my ‘menu’ to my own preference. I have the ‘command’ enclosed in square brackets as a sort of visual cue for my interface. You could choose to format it a different way, ie:
Write-Host @"
info - Display Computer Info
?    - Display help
Q    - Quit
"@
or
Write-Host @"
_________________________________
| info | Display Computer Info  |
| ?    | Display help           |
| Q    | Quit                   |
_________________________________
"@
How you present the menu is totally up to you .
The Switch
The user inputs whatever they like into the menu, and then the script matches that up to one of our possible commands with a switch statement:
    switch ($menuChoice) {
        '?' {
            Write-Host "Created by Barclay McClay"
            break
        }
        'q' {
            break
        }
        default {
            Write-Host "- Invalid Input -" -ForegroundColor Red
        }
    }
Let’s add “info” as a possible outcome for our switch:
    switch ($menuChoice) {
        'info' {
            Write-Host " ---- Computer info: ---- " -ForegroundColor Green
            break
        }
        '?' {
            Write-Host "Created by Barclay McClay"
            break
        }
        'q' {
            break
        }
        default {
            Write-Host "- Invalid Input -" -ForegroundColor Red
        }
    }
Now if the user inputs ‘info’ into the main menu, our script will responds in green text with: ”—- Computer info: —-”
Next we’ll add some PowerShell commands that will get data about the computer and display it here.
The cmdlets
We’ll use Get-CimInstance with different flags for most of the ‘computer info’. Official documentation for CIM (Computer Information Model) cmdlets are here (be warned- it’s encyclopaedic, and nobody expects you to read it).
You can run these cmdlets directly into the interpreter to try them out, for example:
Get-Ciminstance Win32_ComputerSystem
For this CLI, I don’t want to simply present the user with the stock-standard results you get when running these commands normally. Instead, we will store the information we gather from these cmdlets inside $variables, and then use these $variables to create our own ‘table’ of information:
$operatingSystem = Get-CimInstance Win32_OperatingSystem
$computerSystem = Get-CimInstance Win32_ComputerSystem
$cpuInfo = Get-CimInstance Win32_Processor
$storageInfo = Get-CimInstance Win32_LogicalDisk
$diskInfo = Get-CimInstance Win32_DiskDrive
$gfxInfo = Get-CimInstance Win32_DisplayConfiguration
$localtimeInfo = Get-CimInstance -ClassName Win32_LocalTime
That should be plenty. You can explore the Get-CimInstance flags for many more possibilities (there are over 750+ Win32_ flags alone).
Hash Tables
A hash table in PowerShell is a data structure that holds key-value pairs.
In other words, instead of just making a regular list like this:
Cereal
Tuna Wrap
Pasta
Ice Cream
You want to organise your values with keys like this:
Breakfast: Cereal
Lunch:     Tuna Wrap
Dinner:    Pasta
Dessert:   Ice Cream
To ‘initialise’ a hash table (prepare it to store information) we define it with @{} like so:
$allInfo = @{}
Now we’ll start storing our info as key/value pairs:
$allInfo['Name'] = $computerSystem.Name
$allInfo['Domain'] = $computerSystem.Domain
Lets break these lines down
$allInfo- This is the variable that contains the (empty as yet) hash table we just defined.
['Name']and['Domain']- To access elements within a hash table, we use this syntax; the square brackets enclose the key’s name as a string. If there is no key that matches what you put in the square brackets, then a new key will be created. In this case, we are defining new keys called ‘Name’ and ‘Domain’ in our hash table.
$computerSystem.Name- We defined our
$computerSystemvariable earlier- it stores the results of theGet-CimInstance Win32_ComputerSystemcmdlet. This cmdlet (when executed without any flags or arguments) returns an object with six elements:
Domain              : < Domain (likely WORKGROUP if this is a personal device) >
Manufacturer        : < Motherboard / Laptop manufacturer >
Model               : < Motherboard / Laptop model >
Name                : < Computer's name >
PrimaryOwnerName    : < This comes from a registry key HKEY_LOCAL_MACHINE\\SOFTWARE\\Microsoft\\Windows NT\\CurrentVersion\\ >
TotalPhysicalMemory : < RAM in bytes >
This is all stored in the
$computerSystemvariable now. We want to retrieve specific properties (namely the ‘Name’ and ‘Domain’ properties) from our variable. If it were a hash-table, we’d use the square-brackets syntax covered above. But our$computerSystemvariable is not a hash-table, it is a PowerShell ‘object’, and it’s properties are accessed using the ‘accessor’.full-stop/period. So$computerSystem.Namereturns the ‘Name’ property of that object.- We defined our
The completed switch statement…
Here’s the full code for our info switch, making use of a hash table:
'info' {
Write-Host " ---- Computer info: ---- " -ForegroundColor Green
# Get info
$operatingSystem = Get-CimInstance Win32_OperatingSystem
$computerSystem = Get-CimInstance Win32_ComputerSystem
$cpuInfo = Get-CimInstance Win32_Processor
$storageInfo = Get-CimInstance Win32_LogicalDisk
$diskInfo = Get-CimInstance Win32_DiskDrive
$gpuInfo = Get-CimInstance Win32_DisplayConfiguration
$timeInfo = Get-CimInstance -ClassName Win32_LocalTime
# Organise info into hash-table
$allInfo = @{} # define hash table
$allInfo['Name'] = $[computerSystem.Name](<http://computersystem.name/>)
$allInfo['Local Time'] = "$($timeInfo.Day)/$($timeInfo.Month)/$($timeInfo.Year) $($timeInfo.Hour):$($timeInfo.Minute)" # DD/MM/YYY hh:mm
$allInfo['Domain'] = $computerSystem.Domain
$allInfo['Motherboard'] = "$($computerSystem.Model) | $($computerSystem.Manufacturer)"
$allInfo['Serial Number'] = $operatingSystem.SerialNumber
$allInfo['Processor'] = $[cpuInfo.Name](<http://cpuinfo.name/>)
$allInfo['GPU'] = $gpuInfo.DeviceName
$allInfo['Operating System'] = "$($operatingSystem.Caption), $($operatingSystem.OSArchitecture), Build $($operatingSystem.BuildNumber)"
$allInfo['Total RAM (GB)'] = "$($computerSystem.TotalPhysicalMemory /1GB) GB"
$allInfo['Storage'] = foreach ($drive in $storageInfo) {
if ($drive.DriveType -eq 3) {
"$($drive.DeviceID) $(($drive.FreeSpace/1GB).ToString("N2"))GB Free of $(($drive.Size/1GB).ToString("N2"))GB"
}
}
$allInfo['Disk'] = foreach ($disk in $diskInfo) {
"$($disk.DeviceID) $(($disk.Size /1GB).ToString("N2"))GB"
}
# Display the table
$allInfo
}
I used a few tricks to wrangle the information into a more human-readable form, for example, what’s going on with this line of code:
$(($drive.FreeSpace/1GB).ToString("N2"))
Firstly, it is wrapped in $() . This is called variable substitution, and can be easily demonstrated with something like this:
$username = "Barclay"
Write-Host "Welcome $username"
# Output: Welcome Barclay
We don’t need to use $() to enclose the $username variable because it is a simple string-substitution. But what happens when you want to do something more complex inside the string, like a calculation or a function call? That’s where the $()notation comes in. It’s basically saying “evaluate what’s inside these brackets as code”. So if you have a bit of code like:
$age = 10
Write-Host "Twice your age would be $($age * 2)"
# Output: "Twice your age would be 20"
PowerShell will calculate $age * 2 and then put the result into the string.
Otherwise, if you wrote it without the dollar-bracket $():
$age = 10
Write-Host "Twice your age would be $age * 2"
# Output: "Twice your age would be 10 * 2"
PowerShell does not know you want it do the math, and literally writes out the equation instead.
Back to our code, inside the $(), we have ($drive.FreeSpace/1GB). Here we are accessing the FreeSpace property of our $drive object. FreeSpace is returned in bytes by default, so /1GB converts it to gigabytes. This is enclosed in brackets so it gets executed before interacting with any of the other operations in the line (just like BODMAS or whatever you called it at school). Then we take that value (the hard-drive’s free space in GB) and perform the ToString("N2") method on it. “N” stands for Numeric and “2” is the number of decimal places you want. So, “N2” means we want our number displayed as a numeric value with two decimal places.
There’s a few other things going on in this script that I haven’t explained, and won’t bother to here. If you are a beginner, interacting with the objects returned by the Get-CimInstance cmdlets isn’t a specific thing to focus on. It is just the avenue I’ve chosen to demonstrate some basic PowerShell.
Optimising the code with a Custom Object
The above code shows how to pull information about the computer, store it in a hash table, and display it. But in ‘real life’- instead of using a hash table, we can use the [PSCustomObject]@{} construct to create a ‘custom object’. Hash tables store data as key-value pairs. Custom objects, on the other hand, store data as properties with associated values. Eg:
Custom Object:
| Hair | Blonde |
|---|---|
| Eyes | Brown |
| Lips | Pink |
| Nails | Blue |
Hash Table:
| Key | Value |
|---|---|
| Hair | Blonde |
| Eyes | Brown |
| Lips | Pink |
| Nails | Blue |
- When the PowerShell terminal displays objects on the screen, the formatting looks better. I know that sounds like a cop-out reason, but see for yourself.
- By default, hash tables in PowerShell do not maintain any order to their elements. Whereas custom objects inherently preserve the order in which properties are added. We can leverage this to make sure our output consistently has the computer’s name appear first in our list, for example.
Write-Host " ---- Computer info: ---- " -ForegroundColor Green
$operatingSystem = Get-CimInstance Win32_OperatingSystem
$computerSystem = Get-CimInstance Win32_ComputerSystem
$cpuInfo = Get-CimInstance Win32_Processor
$storageInfo = Get-CimInstance Win32_LogicalDisk
$diskInfo = Get-CimInstance Win32_DiskDrive
$gpuInfo = Get-CimInstance Win32_DisplayConfiguration
$timeInfo = Get-CimInstance -ClassName Win32_LocalTime
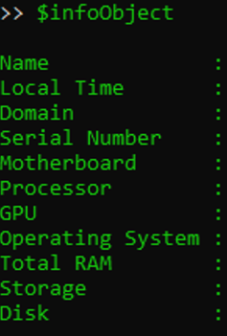
$infoObject = [PSCustomObject]@{
'Name' = $computerSystem.Name
'Local Time' = "$($timeInfo.Day)/$($timeInfo.Month)/$($timeInfo.Year) $($timeInfo.Hour):$($timeInfo.Minute)" # DD/MM/YYY hh:mm
'Domain' = $computerSystem.Domain
'Serial Number' = $operatingSystem.SerialNumber
'Motherboard' = "$($computerSystem.Model) | $($computerSystem.Manufacturer)"
'Processor' = $cpuInfo.Name
'GPU' = $gpuInfo.DeviceName
'Operating System' = "$($operatingSystem.Caption), $($operatingSystem.OSArchitecture), Build $($operatingSystem.BuildNumber)"
'Total RAM' = "$($computerSystem.TotalPhysicalMemory /1GB) GB"
'Storage' = foreach ($drive in $storageInfo) {
if ($drive.DriveType -eq 3) {
"$($drive.DeviceID) $(($drive.FreeSpace/1GB).ToString("N2"))GB Free of $(($drive.Size/1GB).ToString("N2"))GB"
}
}
'Disk' = foreach ($disk in $diskInfo) {
"$($disk.DeviceID) $(($disk.Size /1GB).ToString("N2"))GB"
}
}
$infoObject
This uses less lines than the above demonstration, and I’m happy with its output (pictured).
But we can take the organisation of this program to a new level, and it’s better to make this decision earlier rather than later…
'Refactoring' the code
Code ‘refactoring’ is the process of changing the structure of the code, without changing its function.
Since each switch statement in out menu could potentially be many lines of code- our overall script will end up being very large and unwieldy. So instead of having all the code in just one script- we’ll separate each menu option to it’s own script, then use our switch statements to pick and choose between these scripts instead.
To achieve this, create a new folder called “commands” in the same directory as the current script. Make a new file inside that “commands” folder called “CLI_info.ps1” and move all the code above to there. Then inside my switch statement in the main script I have:
switch ($menuChoice) {
        'info' {
            & ".\\commands\\CLI_info.ps1"
        }
        '?' {
        Write-Host "Created by Barclay McClay"
        break
        }
        'q' {
        break
        }
        default {
        Write-Host "- Invalid Input -" -ForegroundColor Red
        }
    }
The &operator in PowerShell is known as the call operator. One of its most common uses is to put the call operator with a string that contains the path to a script (like we are here), and PowerShell will execute that script.
Now you can build your own
Every PowerShell script that you write can be stored as its own file in this “commands” folder, and added to the switch-statement ‘menu’ accordingly. This can be really handy for when you find yourself performing the same set of commands over and over. Or if you need a quick and unique ‘calculator/converter/generator’ of some sort that you can code up in PowerShell. You can even call scripts written in different programming languages from this PowerShell CLI. As you develop more and more scripts/start doing more things with code, you can maintain this menu as a handy directory of different functions uniquely useful to you.
Check my github repo of this project for more examples.